When it comes to editing your photos, many beginner photographers are anxious to know which tools to use and how much editing to do. You can improve your image by knowing which tool does what. , Most photographers use Lightroom to edit their photos, so we have A complete guide on how to edit a photo in Lightroom Mod ready for you. Learning to edit photos in Lightroom APK is an important step for photographers. If you’re shooting in a RAW file, your camera just captures the basic data of the scene without any processing. This can make images look lifeless. Image editing is essential to bringing your images to life and fulfilling your creative weight this is just a guide.
There is no right or wrong way to edit photos. It’s all about developing your style as a photographer. Editing can make or break a photo, so you need to understand the tools you use to edit your photos and know when and how to edit photos. In this guide, we will edit a specific unedited photo and turn it into a great one using Lightroom Mod Pro.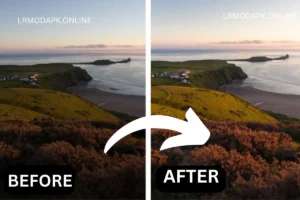
LENS CORRECTION AND TRANSFORM PANELS
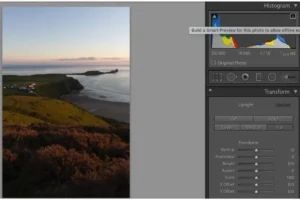
You’ll first need to import the photo into Lightroom. One of the simplest ways is to open Lightroom, click on the File tab at the top, then scroll down to ‘Import photos and videos.’ (You can also add it to a collection from here if you wish). Once that’s done, one of the first things we like to start with is the lens corrections and transform panels. These are found under the ‘Develop’ tab or ‘Optics’ module, depending on what version of Lightroom you’re using. This duo of tools corrects any lens distortions on the image and allows you to experiment with the geometry of your shot. In the lens panel, shown above, click on ‘remove chromatic aberration’ and ‘enable profile corrections’. This can occasionally brighten up your image, so it’s better to do this before making any other adjustments. In the transform panel, which you can see below, we tend to use ‘Auto’ or ‘Full’ to straighten the image. It can sometimes distort the photo too much, if that happens, skip this step. Afterward, we crop and rotate the image as much as needed.
Click the below button if you want to know more about Landscape Photos Editing.
LIGHT LEVELS
The next step is to look at the overall light levels. The histogram shows that the image is generally quite well exposed already so it doesn’t need much adjustment. The left side of the histogram represents the shadows, and the right side represents the highlights. Pay attention to the histogram as you’re making your adjustments, as the backlit computer screen will make your image look brighter than it is. You ideally want your image to be level, without having the whites or blacks peaking at either end. We increased the exposure so the image was brighter overall, then brought the highlights back down slightly to avoid losing the detail in the sky. Another way to adjust the light levels in your image is by using the Tone Curve. Like the histogram, the left part of the tone curve represents the shadows and darker parts of the image, and the right side represents the lighter tones. You can see the background of the tone curve box mimics the shape of the histogram. For a more visual view of which tones you want to adjust, try out the luminance range tool in the Masking section. Here you can use sliders to select specific tones in your image to give yourself more control over the light levels. You can also add/subtract from a mask, so if you only want to adjust the tones in a select part of your image, you can brush out the highlighted areas you don’t want the mask to affect.
Different images need different adjustments, however, a gentle S-curve is a great place to start. The S-curve darkens the shadows and brightens the highlights, which adds contrast to the image.
COLOR ADJUSTMENTS
Once you’ve adjusted your light levels, you can move on to the color adjustments. It’s necessary to be careful with colors and not go overboard as it can make your image look unnatural. You want to enhance the colors that already exist.
Increasing the vibrance brings out the colors in just the midtones, as opposed to the saturation slider which increases the saturation and intensity of every single color in your image. Experiment with both of these sliders and notice the difference between the two. We don’t usually touch the saturation of the whole image, but rather the individual colors in the HSL panel.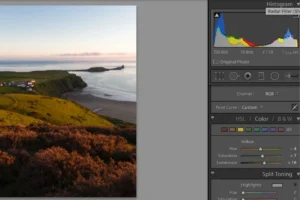 In the HSL panel, you can manipulate the hue, saturation, and luminance of each color in your image. This worked well for the warmer colors in our example. We boosted the saturation and luminance of the oranges and yellows to enhance the warm golden hour light on the hills in the foreground. This tool is great for editing astro shots, as you can bring out the different colors in the constellations.
Another way to enhance the colors in your image is with color grading. Here you can adjust the color of the highlights, midtones, and shadows. This is another tool that is best used in moderation. As this image was taken in the evening, we warmed up the highlights and chose a blue tone for the shadows. You can also use a color range mask, which enables you to select a certain color or range of colors in your image and manipulate those further.
Down in the ‘Detail’ panel:
you can further refine your image. This is where you can sharpen the image and apply any noise reduction adjustments. This image was shot at ISO 800 so there was a small amount of noise that needed cleaning up. You need to be mindful of noise, particularly when editing astrophotography and night images. Reducing noise can sometimes lead to eliminating stars and details in the sky that you want to keep. This is where image stacking comes in handy, there is software that is designed for editing stars and astrophotography images without sacrificing quality and sharpness. See our guide on how to reduce noise in astrophotography for more tips.
EDITING INDIVIDUAL ELEMENTS
Now that all your global adjustments are done, you can move on to editing specific parts of your image individually. You can see we lost some of the detail in the highlights in the sky due to brightening the exposure of the whole image. To correct this, you can use the Select Sky tool in the Masking panel and Lightroom will find and mask the sky in your image where you can make adjustments as necessary.
In the image below, the red mask shows which part of the image is affected by the filter, and you can see the adjustments being made in real-time in the thumbnail on the left.
The radial filter does the same thing only in a circular gradient – you can find this under the Masking panel, or next to the graduated filter if you’re using an older version of Lightroom. Once you’ve applied your filter, you can adjust the light levels, saturation, and sharpness (among other tools) of that highlighted section.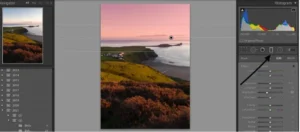
Go and experiment
The brush is another really handy tool for making adjustments to small areas of your image. With it, you can further select parts of the image to be edited where a graduated or radial filter wouldn’t be appropriate. In this image, parts of the foreground are a little dark, so we painted the darker parts with the brush tool to brighten them up. As these areas were naturally in shadow, we made sure not to brighten them too much to avoid them looking unnatural.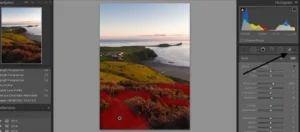 The spot edit tool is particularly helpful for cleaning up any unwanted subjects in your image, for example, it can be used to remove people, rocks, or rubbish. In our example image, we used it to clean up the dry patch on the shoreline. Select the spot edit tool, and click on the area of the photo you’d like to clone out. Move the copied area around the image to find a section that is similar in color & texture to replace the bit you don’t want. Often Lightroom will automatically identify a spot that it thinks is the most accurate.
Lightroom editing is non-destructive so you can experiment with different tools, undo recent or accidental changes, and revert to your original image at any time. !
Final results
Conclusion:
Lightroom is one of the best photo and video editors available on the market. It has many unique features which are way better than the features provided by the other apps. The free version of this app has many restrictions but by downloading the mod APK from our website you get all the premium features for free.